本期推荐的是yi’ge 基于内存和 Redis 的两级 Java 缓存框架——J2Cache。
项目介绍
J2Cache 是 OSChina 目前正在使用的两级缓存框架(要求至少 Java 8)。第一级缓存使用内存(同时支持 Ehcache 2.x、Ehcache 3.x 和 Caffeine),第二级缓存使用 Redis(推荐)/Memcached 。 由于大量的缓存读取会导致 L2 的网络成为整个系统的瓶颈,因此 L1 的目标是降低对 L2 的读取次数。 该缓存框架主要用于集群环境中。单机也可使用,用于避免应用重启导致的缓存冷启动后对后端业务的冲击。
J2Cache 的两级缓存结构:
- L1: 进程内缓存(caffeine\ehcache)
- L2: Redis/Memcached 集中式缓存
数据读取
- 读取顺序 -> L1 -> L2 -> DB
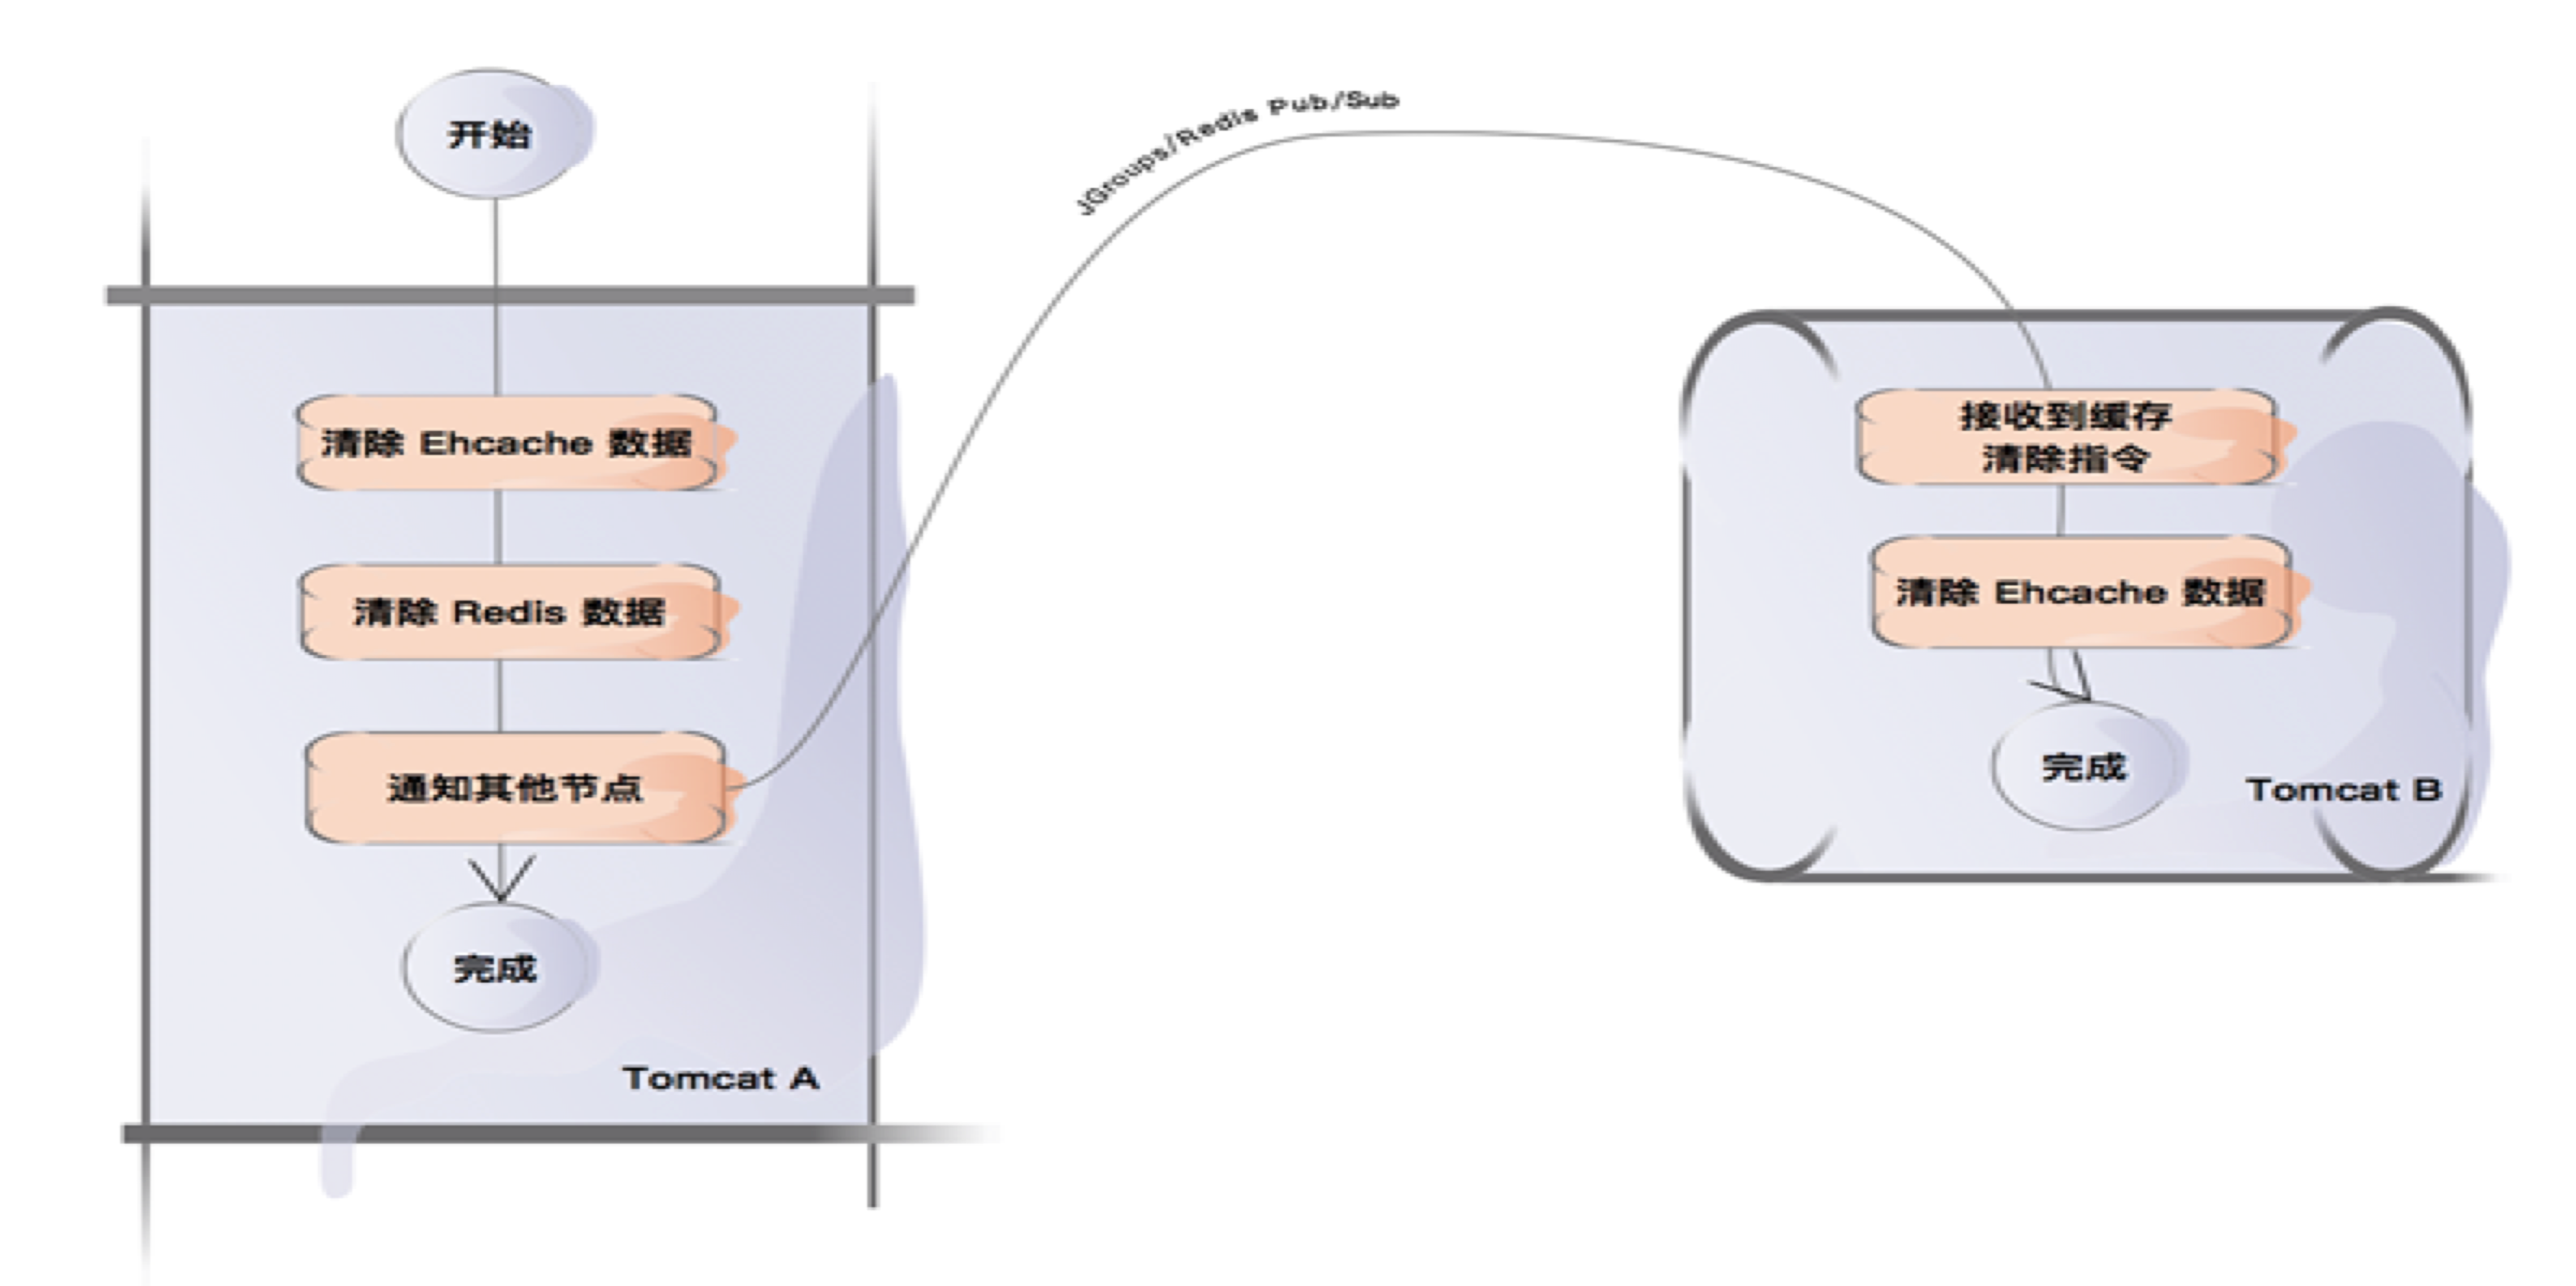
- 从数据库L1中读取最新数据,依次更新 L1 -> L2 ,发送广播清除某个缓存信息,接收到广播(手工清除缓存 & 一级缓存自动失效),从 L1 中清除指定的缓存信息
J2Cache 配置
配置文件位于 core/resources 目录下,包含三个文件:
- j2cache.properties J2Cache 核心配置文件,可配置两级的缓存,Redis 服务器、连接池以及缓存广播的方式
- caffeine.properties 如果一级缓存选用 Caffeine ,那么该文件用来配置缓存信息
- ehcache.xml Ehcache 的配置文件,配置说明请参考 Ehcache 文档
- ehcache3.xml Ehcache3 的配置文件,配置说明请参考 Ehcache 文档
- network.xml JGroups 网络配置,如果使用 JGroups 组播的话需要这个文件,一般无需修改
实际使用过程需要将所需的配置文件复制到应用类路径中,如 WEB-INF/classes 目录。
J2Cache 运行时所需 jar 包请查看 core/pom.xml
测试方法
- 安装 Redis
- git clone https://gitee.com/ld/J2Cache
- 修改 core/resource/j2cache.properties 配置使用已安装的 Redis 服务器
- 在命令行中执行 mvn package -DskipTests=true 进行项目编译
- 打开多个命令行窗口,同时运行 runtest.sh
- 在 > 提示符后输入 help 查看命令,并进行测试
使用方法
J2Cache 默认使用 Caffeine 作为一级缓存,使用 Redis 作为二级缓存。你还可以选择 Ehcache2 和 Ehcache3 作为一级缓存。
准备工作
- 安装 Redis
- 新建一个基于 Maven 的 Java 项目
一. 引用 Maven
<dependency>
  <groupId>net.oschina.j2cache</groupId>
  <artifactId>j2cache-core</artifactId>
  <version>xxxxx</version>
</dependency>
二. 准备配置
拷贝 j2cache.properties 和 caffeine.properties 到你项目的源码目录,并确保这些文件会被编译到项目的 classpath 中。如果你选择了 ehcache 作为一级缓存,需要拷贝 ehcache.xml 或者 ehcache3.xml 到源码目录(后者对应的是 Ehcache 3.x 版本),这些配置文件的模板可以从 https://gitee.com/ld/J2Cache/tree/master/core/resources 这里获取。
使用你喜欢的文本编辑器打开 j2cache.properties 并找到 redis.hosts 项,将其信息改成你的 Redis 服务器所在的地址和端口。
我们建议缓存在使用之前都需要预先设定好缓存大小及有效时间,使用文本编辑器打开 caffeine.properties 进行缓存配置,配置方法请参考文件中的注释内容。
例如:default = 1000,30m #定义缓存名 default ,对象大小 1000,缓存数据有效时间 30 分钟。 你可以定义多个不同名称的缓存。
三. 编写代码
Test.java
public static void main(String[] args) {
    CacheChannel cache = J2Cache.getChannel();

    //缓存操作
    cache.set("default", "1", "Hello J2Cache");
    System.out.println(cache.get("default", "1"));
    cache.evict("default", "1");
    System.out.println(cache.get("default", "1"));

    cache.close();
}
四. 动态构建 J2Cache 实例
J2CacheConfig config = new J2CacheConfig();
//填充 config 变量所需的配置信息
J2CacheBuilder builder = J2CacheBuilder.init(config);
CacheChannel channel = builder.getChannel();
//进行缓存的操作
channel.close();
常见问题
如何使用 JGroups 组播方式(无法在云主机中使用)
首先修改 j2cache.properties 中的 j2cache.broadcast 值为 jgroups,然后在 maven 中引入
<dependency>
    <groupId>org.jgroups</groupId>
    <artifactId>jgroups</artifactId>
    <version>3.6.13.Final</version>
</dependency>
如何使用 ehcache 作为一级缓存
首先修改 j2cache.properties 中的 j2cache.L1.provider_class 为 ehcache 或者 ehcache3,然后拷贝 ehcache.xml 或者 ehcache3.xml 到类路径,并配置好缓存,需要在项目中引入对 ehcache 的支持:
<dependency><!-- Ehcache 2.x //-->
    <groupId>net.sf.ehcache</groupId>
    <artifactId>ehcache</artifactId>
    <version>2.10.4</version>
</dependency>

<dependency><!-- Ehcache 3.x //-->
    <groupId>org.ehcache</groupId>
    <artifactId>ehcache</artifactId>
    <version>3.4.0</version>
</dependency>
如何使用 memcached 作为二级缓存
首先修改 j2cache.properties 中的 j2cache.L2.provider_class 为 memcached,然后在 j2cache.properties 中配置 memcached.xxx 相关信息。
需要在项目中引入对 memcached 的支持:
<dependency>
    <groupId>com.googlecode.xmemcached</groupId>
    <artifactId>xmemcached</artifactId>
    <version>2.4.5</version>
</dependency>


